User ID Tracking with GTM and Google Analytics. Before we start, let’s chat a bit about what Google Analytics counts as a “user”.
The very first time you visit a site that is using Google Analytics for tracking, GA checks to see if you’ve been there before. It does this by looking for certain cookies in your browser and, since in this example you’re visiting for the first time, GA won’t find any of those cookies.
It’ll then drop new cookies are your browser and record you as a “new user” in Google Analytics.
The next time you visit the site, GA will check and find there are cookies there from previous visits. When it finds those existing cookies, it just updates them and marks you down as a “returning user” in Google Analytics.
Now, here’s the rub…
What if you visit a new site in the morning using your laptop, and then visit the same site from your computer at work later in the day?
To Google Analytics, even though it’s technically two different visits by the same user, it’ll record as two different visits by two different users.
Why?
Because in the past, there hasn’t been a way to tell Google Analytics that the two devices are actually the same person.
That is until a couple of years ago, when Google Analytics released its “Universal Analytics” update and added the ability to track across devices by enabling a featured called “User-ID Tracking”.
In a nutshell, “User-ID Tracking” allows you to assign a unique identifier to each one of your users (people who you actually have some sort of relationship with) and then, use that same identifier to track their visits no matter what device they are using.
This is called “Cross-Device Tracking” and it’s the holy grail of tracking as it allows you to track your user as they switch from using their laptop, to their tablet, a smartphone and back again.
Here’s an example of the “Device Overlap” report that Google Analytics makes available once you have User-ID tracking setup:
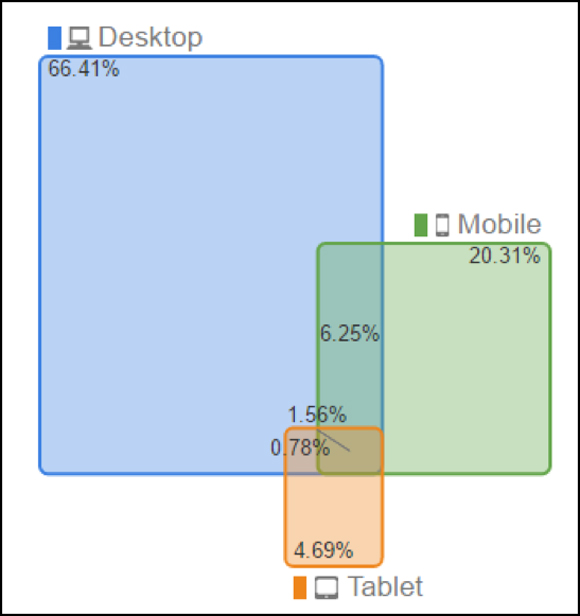
In this example, you can see that the majority of Seriously Simple Marketing’s traffic is from desktop and 6.25% of our users are accessing our site using a combination of both desktop and mobile devices.
User ID Tracking with GTM and Google Analytics: User-ID Tracking Setup
User-ID tracking does take a bit of work to set up, but using Google Tag Manager can make the process a whole lot simpler.
What do you use for this “User-ID” identifier?
The trick to User-ID tracking is to pick something that is both unique to the user AND isn’t something that Google considers “Personally Identifiable Identification” (PII).
What’s an example of PII? Email addresses are a classic example.
Even though it may seem like using an email address as the User-ID is a good idea, Google considers email addresses to be PII so you can’t use them.
My suggestion? Look to your CRM.
As you saw from the ecommerce example earlier in this post, we use Infusionsoft… and Infusionsoft has something called a “Contact ID” that it assigns to every new user that engages with our company (either through opt-in or purchase).
We use Contact ID as the User-ID in Google Analytics and because the Infusionsoft “Contact ID” is just a number—and not something that Google can use to identify the user—it doesn’t count as PII.
REMEMBER: Google doesn’t care if you can use the User-ID to figure out who the user is, they only care that they can’t use whatever value you’re using to figure out who the user is.
User-ID Tracking Setup Step 1
Once you’ve determined what you’re going to use for the User-ID value, you’ll need to get it passed over to Google Analytics.
We’ll use Google Tag Manager to do just that AND we’ll do it the same way we passed ecommerce data over to Google Analytics.
First, get the User-ID value in the URL so we can set up a GTM URL variable to grab the value.
With Infusionsoft, this is pretty easy since we just check a box that passes through the contact data in the URL whenever someone opts-in or purchases a product.
Here’s an example of one of our “thank you” pages and what the URL looks like:

As you can see, there is a parameter in there called “contactId” and that’s what we’re going to tell Google Analytics to use as the “User-ID”.
User-ID Tracking Setup Step 2
We need to set the GTM URL variable to grab the value we need.
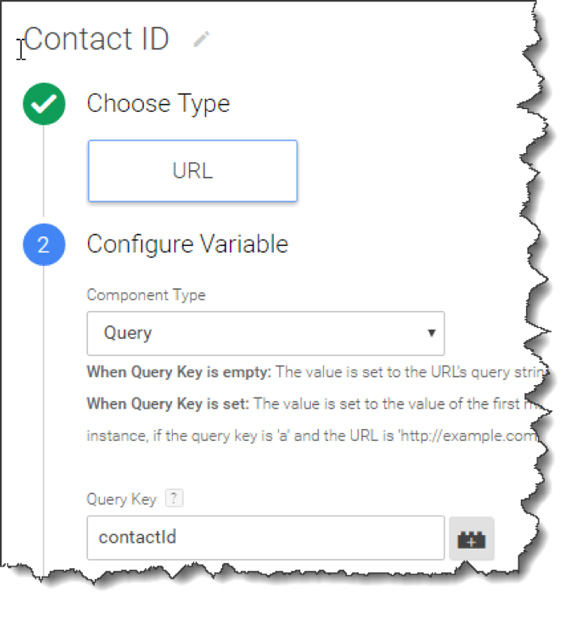
This is EXACTLY the same type of variable we used for ecommerce reporting earlier. This time, we’re telling GTM to look in the URL for the parameter called “contactId” and return with whatever value is there.
Once we have the value we need, it’s time to pass it to Google Analytics.
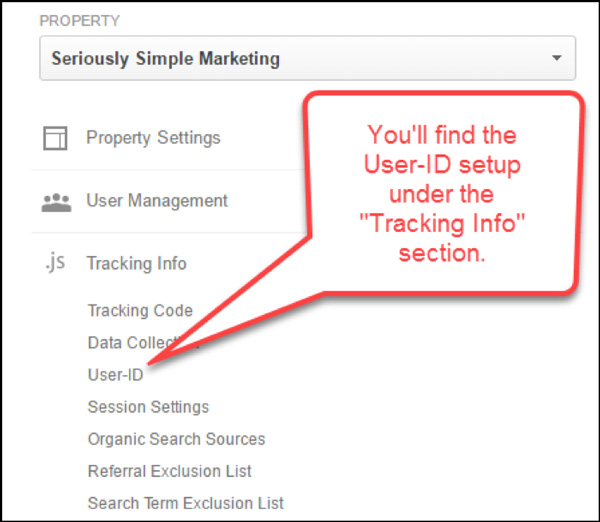
To do that, we’ll need to head over to Google Analytics and make sure it’s set up to receive and use the User-ID.
We’ll jump into the GA property and activate User-ID tracking here:
Once you begin your setup, you’ll see a spot to accept Google’s Terms on what you can and cannot track using the User-ID reporting function.
From there, you see that “Session Unification” has been turned on for you…
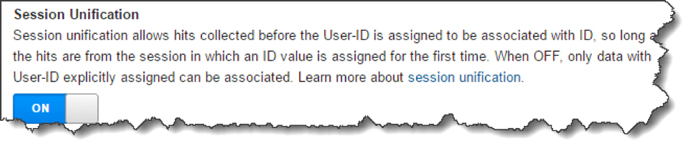
This is a nifty little feature that you’ll generally want to have turned on. Basically, this makes sure that any hits that were received before the User-ID was known are retroactively applied to that User-ID once it is known for the first time.
User-ID Tracking Setup Step 3
Finally, you’ll create the actual User-ID view here…
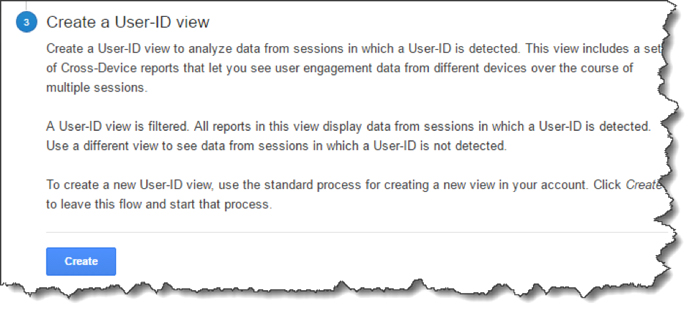
Why is the new view needed? Because User-ID views are unique and contain reports that are unique to these views.
For example, you’ll have the new User Explorer report:
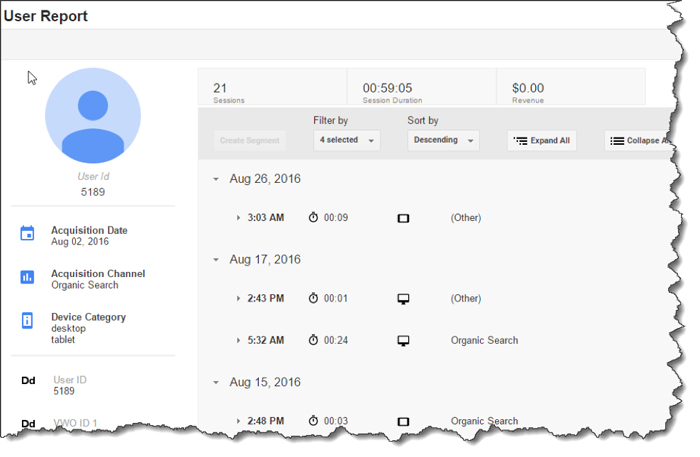
Here you can get detailed information about specific users.
You’ll also have access to Cross Device reports that’ll show you which devices your users are using and how they are using them (in what order).
Keep in mind, the User-ID views are only going to track sessions that have a User-ID associated to them, so they won’t contain the same amount of traffic as your other views (since they are tracking all sessions… even those without User-ID’s).
Now that we’ve got Google Analytics set up to receive User-ID’s and we’ve got Google Tag Manager collecting User-ID’s (via the URL Variable we created earlier), it’s time to send the User-ID over to GA using GTM.
To do that, we’ll be making one tiny tweak to our “Page View” tag (the same one you’ve already setup in GTM).
Just this part…
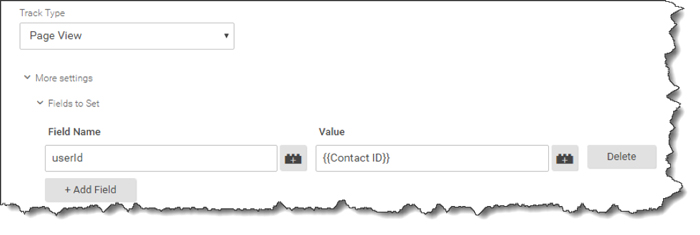
Click on “More Settings > Fields to Set” and then add a field called “userId” (you’ll see it pop up in the dropdown menu of available fields). Then enter in whatever variable you are using to collect your User-ID. We setup one called “Contact-ID” earlier, so we’ll be using that.
Publish your updated tag and that’s it! Google Tag Manager is now sending over User-ID information to Google Analytics and you’ll have a whole new level of data about your users.
Before we end this section, here’s a Pro Tip…
Google Tag Manager can only report the User-ID to Google Analytics if it knows the User-ID.
We already set up grabbing the User-ID from the URL, but that only works if the User-ID is in the URL.
We’ve set up our Infusionsoft to report that field in the URL whenever someone purchases a product or opts-in for an offer.
But what if they are visiting our site from an email we sent out afterward? Google Tag Manager won’t have a way to identify them as a user.
Fortunately, there is a simple way to remedy this. In our case, we just add a merge field to the links in our emails that pass through the Contact ID so it shows up in the URL. As long as that is there, GTM sees it and passes it through to GA.
Another cool technique for User-ID setup using Google Tag Manager can be found in this post by Simo Ahava. In it, he describes a technique that he uses to make sure the User-ID is associated with as many sessions as possible. It’s a bit more technical, but incredibly powerful.
As you can see, with Google Tag Manager you can set up everything from basic page view information, all the way to more advanced things like ecommerce and User-ID tracking.
As with all tools that have this much power, take it one step at a time. There is no need to rush. If something isn’t making sense, a quick Google search will reveal lots of resources available to help you!
