
Have you heard about Google Tag Manager (GTM)? Have you tried using it? And what did you think?
Found it confusing? Say no more! We understand, but it’s worth persevering, as Google Tag Manager is about to become your new best friend.
We’ve put together a “Complete Guide to Google Tag Manager” — to help you understand the what’s and how’s of GTM.
To start with, you’ll learn…
- The 2 main elements of Google Tag Manager (and how you can get them to work together).
- How to setup your Google Tag Manager account and your first container.
- How to create your first couple of tags using triggers and variables.
Next, we’ll delve in deeper with…
- Advanced uses of variables.
- How to use the GTM’s “data layer” to report eCommerce transactions (sales) in Google Analytics.
Finally, we’ll show you…
- How to setup and use customer dimensions
- How to track users across devices
So, “what” is Google Tag Manager?
Historically, when a non-techi, eg a marketing manager, wanted to add a snippet of code such as a Facebook pixel onto a web page, they’d have to get someone in IT to add it for them. This often caused delays and frustrations for both marketing and IT, so Tag managers were created to give marketing teams a way to update their website without having to rely upon IT.
Tag managers were introduced as a “dashboard” that enables marketers to manage anything ‘script’ related for the purpose of tracking their marketing results. Google Tag manager launched their own version in 2012.
With GTM, you can see literally every single click that happens on your site. It works closely in conjunction with Google Analytics and is THE place where you manage ALL scripts and tags that you need to track activity across your site.
- Google Tag Manager gives you, as a marketer, a whole new level of tracking ability.
- It makes it simple a breeze to add pixels and tracking scripts on your site
- Saves you having to add the scripts manually to each page on your website
- Enables you to completely customise the data that gets reported to Google Analytics
- Ensures you can track specific actions that your visitors are taking.
- Includes tracking actions as diverse as reporting Page views to specific button clicks.
Yes, there is a learning curve with Google Tag Manager, but we LOVE IT and think it’s well worth the effort!
Google Tag Manager: Tags & Triggers
Let’s get started…
There are two main parts to GTM:
- Tags –A tag is a snippet of code that executes on a page. Any snippet of code that you want to add to your website, such as Google Analytics, Google Adwords, Facebook Pixels, custom scripts such as Online chat widget and more can be added to GTM. These are the basic components that enable you, for example, to “Send a page view to Google Analytics.”
- Triggers – These tell GTM when you want it to fire a tag. For example, “Anytime someone visits a page”, “Anytime someone visits a specific page”
We’ll explain how these work together later, but first, let’s create a GTM account.
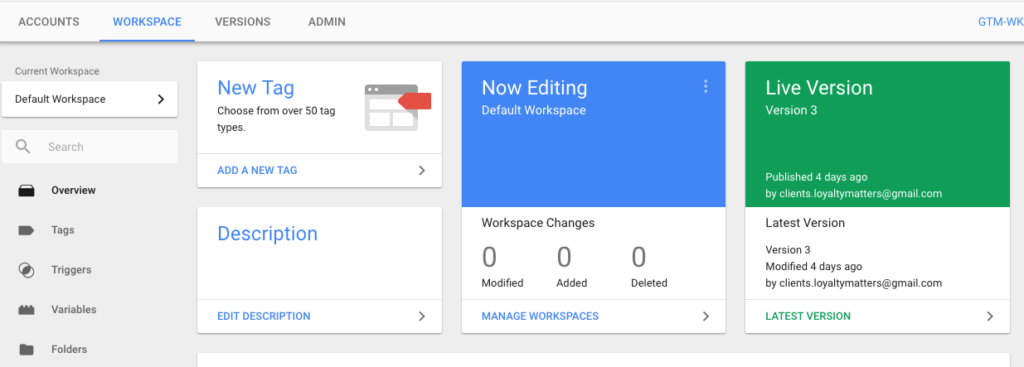
Start by visiting the Google Tag Manager page and sign in.

Follow the steps to create your first account and you’ll be asked to set up something called a “container”. Typically, you’ll create a container for each website you’ll want to track.
Once you’ve created your account, and your first container, GTM will give you a snippet of code that looks like this:

Just copy and paste this code so it’s right after the opening <body> tag of your site — if you are using a WordPress site, you can also use a plugin like DuracellTomi’s Google Tag Manager Plugin to easily add the code.
With GTM successfully installed, it’s time to create your first official tag!
Let’s start by telling Google Tag Manager we want to report a Page view to Google Analytics every time someone visits one of our pages.
Here’s how to set that up…
Tags & Triggers Step #1: Create a New Tag
Create a new tag by clicking on “Tags” on the left menu and then “New”.
Google Tag Manager will then want to know which type of product you would like to create a tag for. Google Analytics is deeply integrated with GTM, but there are lots of other ‘Tag’ that you add. Click ‘tag configuration’ to select a type of tag.
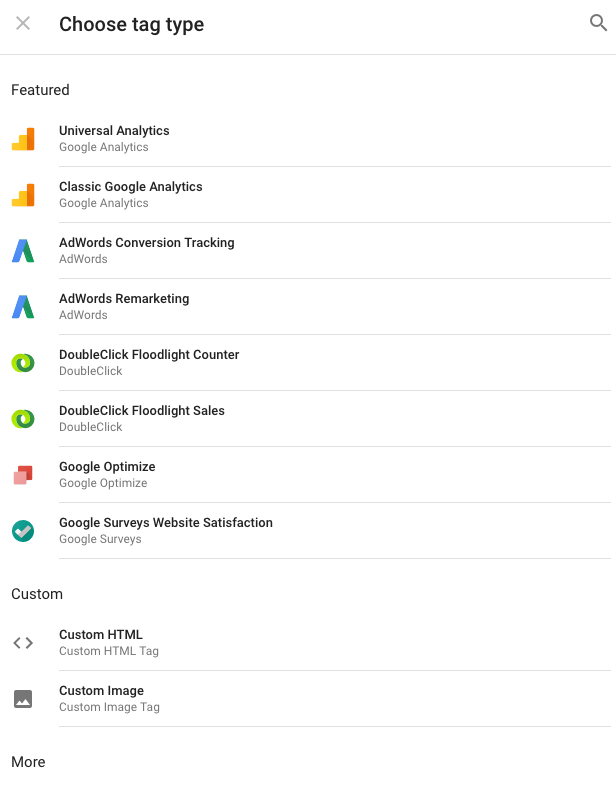
Select “Universal Google Analytics” (we don’t recommend using the older style ‘classic’ analytics).
Triggers Step #2: Choose Where You Want Your Tag to Fire
Once you’ve selected the tag you want to use you’ll need to add your tracking ID. If you’re not sure where to find this Follow these directions.
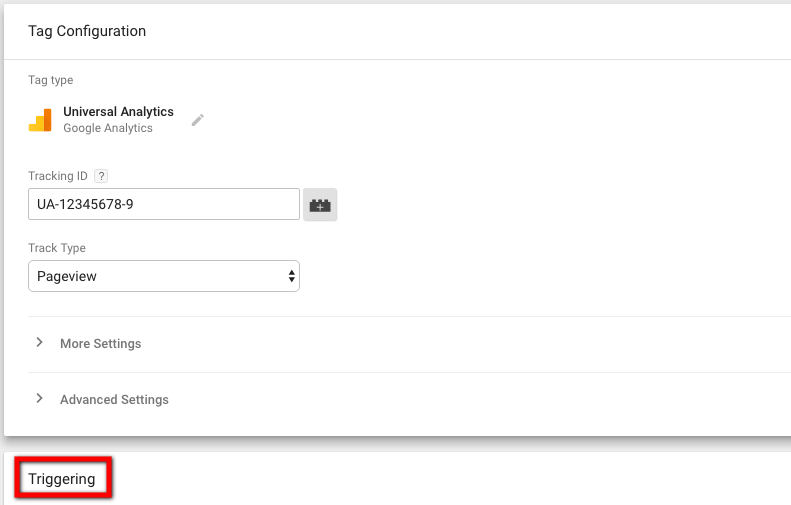
Enter your Google Analytics tracking ID and click ‘triggering’
Tags & Triggers Step #3: Define Your Trigger
After clicking “triggering”, you’ll need to define the Trigger. Remember, the “trigger” is how you tell GTM when it should fire this particular tag.
In this case, we want it to report Page views whenever someone visits a page, so we’ll select “All Pages” as the trigger.

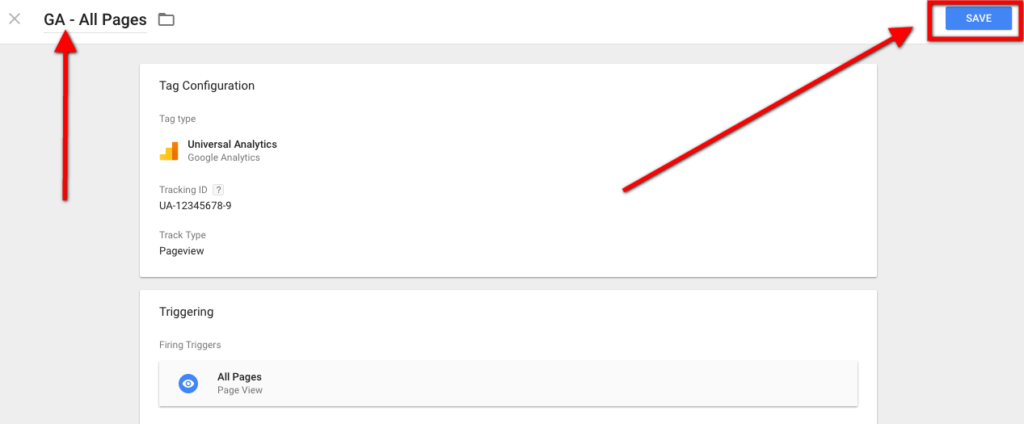
Tags & Triggers Step #4: Name Your Tag
Once you’ve selected “All Pages”, give your trigger a name and click save.
[su_note]Pro-tip… GTM will list out all of the tags in alphabetical order. So use a sensible naming convention![/su_note]
Once your tag has been named, you have just one last step to complete…
Tags & Triggers Step #5: Publish Your Tag
Google Tag Manager doesn’t instantly push your changes live. Instead, much like when you create a WordPress post, you’ll need to “Publish” your changes before they become live.
In the upper right corner of your page, you’ll see how many changes are currently waiting to be published and the “Publish” button.
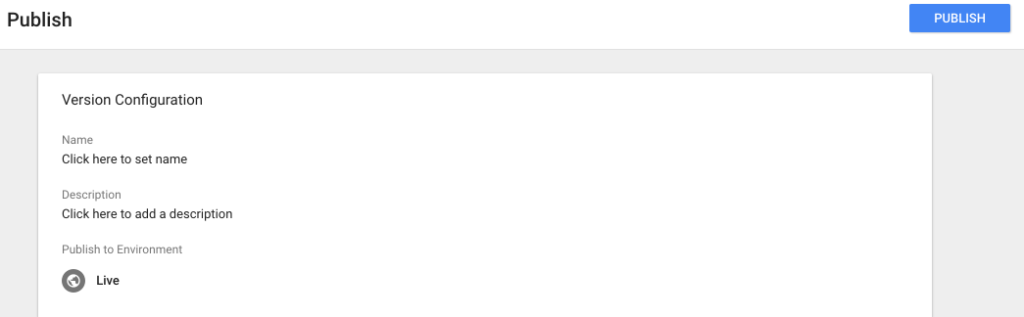
After you’ve clicked “Publish” your changes will be posted live to your website and your newly created Page view tag is officially passing data to Google Analytics!
Important note: Avoid duplicating your data.
[su_note]If you use Google Tag Manager to control your Google Analytics (which we’d recommend), you need to ensure you remove your existing Google Analytics tracking code from your pages. If you don’t, the traditional GA code will report & the new GTM Tag will report… which will cause inaccurate data.[/su_note]
And that’s it! Your first tag is now in place! And, you’ve started telling GTM to send a Page view to Google Analytics and you have setup your first trigger, which tells GTM to send that Page view every time a page is loaded.
Variables: ‘How’ to use them with Google Tag Manager
So, you’ve reached first base! But there’s even more you can do with Google Tag Manager!
Introducing ‘Variables’.
Variables are optional. If you have a straightforward website, they may not be necessary. What they do, is give GTM access to additional information to help your triggers and tags do more. T hey also save time repeatedly using the same information.
For example, if your Google Analytics Property ID is ‘UA-12345678-9’. You could save this as a ‘variable’ that you can easily select when you are setting up your tags and triggers.
Instead of inserting your tracking ID as you configure your tag…
![]()
Instead you could set it up as a variable.
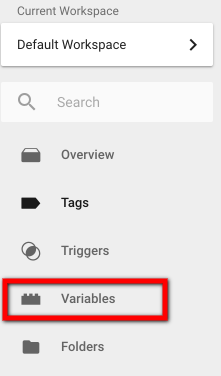
- First, select “Variables”
2. Scroll down to the section “User Defined Variables” and click “New” to create your own variable.
3. Configure your variable by selecting ‘your variable type’. In this example we’ll select ‘constant’ as our new variable needs to remain constant every time it is used.
4. Assign a value to your variable eg: UA-12345678-9 (replace with your own ID!)
5. Give your variable a name eg ‘My UA Tracking ID’ and click save
[su_note]Pro-tip… Don’t forget GTM will list out all of the tags in alphabetical order. So use a sensible naming convention![/su_note]
Next: Adjust Your Previous Tag
Now that you’ve saved your new variable, you can adjust your previous Page tag so it uses the variable instead of you having to type in “UA-12345678-9” every time.
Select the “GA – Page view” tag you created earlier, and edit the details.
You simply need to find the UA # you had previously entered and delete it. Then, click the “lego block” icon and it’ll drop down a list of variable you can use (including the new one you just created).

Now that you’ve changed the tag to use the variable, publish your changes.
You’ve now successfully updated the tag and it will automatically replace {{My UA Tracking ID}} with your UA.
Google Tag Manager: Tags, Triggers, & Variables
So, what else can you do with Google Tag Manger? Lots!.
Would it be useful to you if you could automatically track every time a visitor clicks on one of your links? And sends the details of the click to Google Analytics with the details of…
- what page they were on
- when they clicked
- what link they clicked on…
We thought so! You will be using tags, triggers, and variables to achieve this.
First, you need to activate a number of the built-in variables within Google Tag Manager, so GTM can automatically get the details we’ll need.
Click on “Variables”…
… and select all the Clicks, Pages and Forms variables; like this:

Next, let’s setup a tag that will…
- automatically track a link click,
- report to GA that a “Click” happened,
- send the URL of the page they were on when they clicked the link,
- send the URL of the link they clicked on.
This is what that tag looks like…

- Tracking ID – use the variable you created earlier
- Track type – Select ‘event’ from the drop down list
- Category – type in ‘Click’. This will then show on your GA reports
- Action – select the built in {{Page URL}} – this will be replaced with the page url where the click event happened
- Label – select the built in {{Click URL}} – and the destination URL for the click will be reported in Google Analytics
You now have a tag that tells GTM to report an event to Google Analytics every time that a “Click” happen and it will pass the details of that click (including the page they were on and the actual URL of the click).
You’re using variables to automatically insert your GA Property ID, as well as both the Page and Click URLs of the click.
All that GTM needs now is to know when it’s supposed to report these details! This is where triggers come into play! Fortunately GTM will prompt you to add a trigger – as it knows the event will not fire unless one is added!

[su_note]If you save the Tag without adding a trigger – you can add it later by selecting ‘triggers’ from the GTM left menu.[/su_note]
You can choose an existing trigger, or click the ‘+’ link to add a new one.

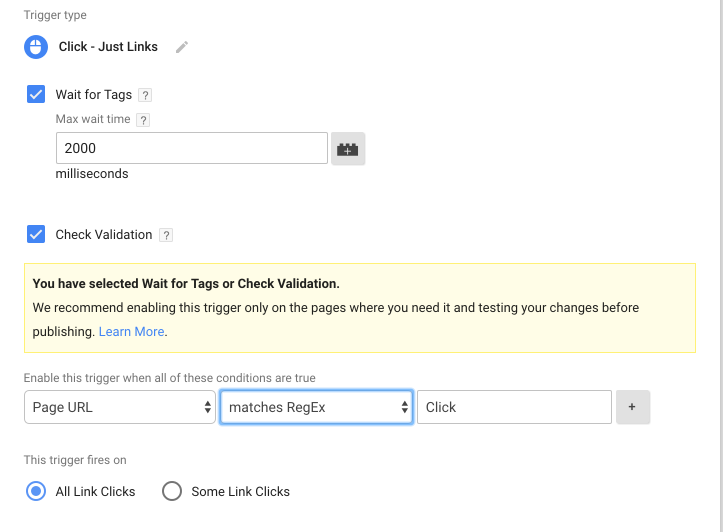
In this example, we want to create a new trigger, based upon users clicking a link. So, let’s start by clicking ‘+’ to create a new trigger and select ‘Clicks’ – all elements or just the link. We’ll select ‘just links’.

Here’s how you’ll want to setup this trigger…
Now that you have saved the trigger for your new tag, go ahead and publish the changes.
From now on, when you go into your Google Analytics account, you will see your new events flowing through in your BEHAVIOR > EVENTS reports…

Using GTM to report on Virtual Pageviews
Virtual pageviews allow you to use destination goals when the actual URL of the page doesn’t change. This can be handy in a variety of situations: shopping carts, registration processes, and any other process that has multiple steps where the URL doesn’t change. Basically, you need to tell Google Analytics a new page is being viewed when it isn’t. In the old days, you used to have to hard code a page view in the source to do this. But with Google Tag Manager, it is now easy to set up virtual pageviews. Once you have figured out where you want your virtual pageview to fire, it’s a snap to set up in Google Tag Manager.
- create a new tag
- pick Google Analytics
- give the tag a name eg ‘virtual page view’ and link it to your Google ID

4. Assign a virtual URL to your virtual pageview
5. Assign a firing rule eg you could listen for a button to be clicked, listen for an event you have coded into the site to fire, listen for a form to be submitted. Just use the basic principles of Auto-Event Tracking for this step
6. test and publish
7. Align the Goal in Google Analytics with your Virtual Pageview by simply entering the virtual URL from your tag into the Goal URL (or funnel step URL) in Google Analytics.

There is definitely a learning curve to Google Tag Manager.
But, we think it’s definitely worth it.
Once you create your first tag, you’ll get a better feel for how it works.
We’d recommend testing out new tags triggers and variables. Think about what you want to achieve / report on, ad work back from there. If you are not sure – you can always restrict the setup to one page – so you can test the results, and unpublish if necessary!
Start by creating your own variables and then move into deeper waters with events.
Remember… take one step at a time. There’s no need to rush. If something isn’t making sense, there are lots of resources available to help you.
Coming soon – ‘ultimate guide to Tag Manager – Part 2’! Watch this space…
